01. Welcome to Linux
Welcome to the Faculty of Automatic Control and Computers and to the ‘Introduction to Operating Systems’ (USO) course! The ‘Introduction to Operating Systems’ course helps you take your first steps into the world of computers, the world of operating systems and the world of Linux. Let’s get started!
This is a USO lab session. In a lab session, we’ll be working hands-on with the operating system, the Sway window manager, processes, users, services and the network. In short, we’ll cover all the components that a user encounters in an operating system.
In this lab session, we’ll introduce the resources you’ll be using on the USO course and you’ll take your first steps in using Linux.
Objectives
As this is an introductory lab session, the objectives are:
- To get to know your lab colleagues and the teaching assistant; to foster an informal atmosphere
- To find out about the resources available for the USO course
- To understand the mindset required for the USO lab
- Learn to use Sway with the keyboard: windows, workspaces and layouts
- Take the first steps in the terminal: run commands, copy, paste and clear the screen
- Get a short overview of the Linux distribution families
- Understand what a Virtual Machine is and install a Linux distribution in one
- Connect to another Linux machine using SSH
Let’s get to know each other
To begin with, let’s get to know each other better. Together with the lab assistant, say:
- name: how people call you, not what’s on your ID card
- which town/school you come from
- why you chose this study programme
- what your first impression of the university is
The lab assistant will ask you some more questions. Feel free to ask the lab assistant any questions you may have or anything you’re curious about.
We don’t want to be too formal. Avoid expressions such as ‘you’ or the second-person plural. We’re friends and we’re learning together; we help each other and enjoy having a chat.
Course Resources
Wiki (other series course website)
Link: https://ocw.cs.pub.ro/courses/uso/
The Open Courseware wiki platform is where you’ll find the study materials of other series: lecture slides, lab exercises, links to the timetable, syllabus, virtual machines and other necessary supplementary resources.
Microsoft Teams
Announcements and most of the discussions (except homework support) take place in this team.
curs.upb.ro
Link: https://curs.upb.ro/
This is the online course platform for the Faculty of Automatic Control and Computers. At USO, it is the dynamic component of the course, where communication with the teaching team takes place. For both the USO course and other courses using the Moodle platform, you will find:
- Links to courses and practical sessions
- Useful announcements for you
- A discussion forum where you can ask questions about the course or the faculty
- You can provide feedback to the teaching assistants
- Links to homework assignments and their deadlines
Information about accounts can be found on the homepage of the website.
If you have any uncertainties regarding the USO course or laboratory, or the subject in general, or any questions relating to USO or the faculty, please post them on the dedicated forum for the USO course on Moodle. On the discussion forum on the Moodle platform, you will receive quick, prompt and informed answers to questions regarding the USO course and its activities. Please feel free to use the relevant forums when you are not in class or in the laboratory and cannot speak directly to the course lecturer or laboratory assistant.
Before asking a question, please ensure that it has not already been asked by someone else.
Please contact teaching assistants or course lecturers via their personal email addresses only in cases of private matters or issues that do not concern all your fellow students on the forum.
Please do not use Facebook to communicate with the USO team. Please use the forums on curs.upb.ro or the email addresses listed on the team’s page for private discussions.
Facebook page
Link: https://www.facebook.com/uso.acs
The Facebook page is where we post announcements about USO, community activities and (often amusing) news from the world of computing.
The faculty’s NCIT cluster
Link: https://cloud.curs.pub.ro/
The faculty’s NCIT cluster, accessible via the front-end processor at fep.grid.pub.ro using the SSH protocol, is a resource that will be used for homework assignments and the practical test. You log in to the system using the same credentials you use to log in to the Moodle platform (https://curs.upb.ro/).
The cloud infrastructure within the NCIT cluster is based on the open-source OpenStack solution. This is an IaaS (Infrastructure as a Service) solution. It will be used to create virtual machines in the cloud for your practical tests.
Support (issues)
Link: https://support.upb.ro/
The platform where you can submit a ticket if you are experiencing problems with your @stud.acs.upb.ro email account or with the account you use to access the Moodle platform (i.e. the website https://curs.upb.ro).
USO Git Repository
Link: https://github.com/systems-cs-pub-ro/uso
The USO course’s Git repository is where you will find the supplementary materials required for a lab session and, where applicable, source code files for the solutions.
Resources
- Razvan Deaconescu, Razvan Rughinis, Mihai Carabas, Alexandru Radovici, Utilizarea Sistemelor de Operare, Printech 2021
- Brian Ward, How LINUX Works, 3rd Edition, No Starch Press, 2021
- Sway official website
- Sway Wiki on GitHub
- Arch Wiki - Sway - useful even if you do not use Arch Linux
- VirtualBox User Manual
- Arch Wiki - OpenSSH
- The manual pages:
man sway,man 5 sway,man ssh
A manual page is the documentation of a program, installed on your computer. Open one by typing man in the commands terminal followed
by the name of the program in a terminal (for example man ssh). Scroll with the arrow keys and press q
to quit.
Welcome to the Tiles of Sway
When you use Windows, macOS or GNOME, windows are placed on top of each other and you move and resize them with the mouse. Sway works differently. It is a tiling window manager: it arranges the windows automatically so that they never overlap and together they fill the whole screen, like tiles on a floor. When you open a new window, the others shrink to make room for it. Everything is done with the keyboard.
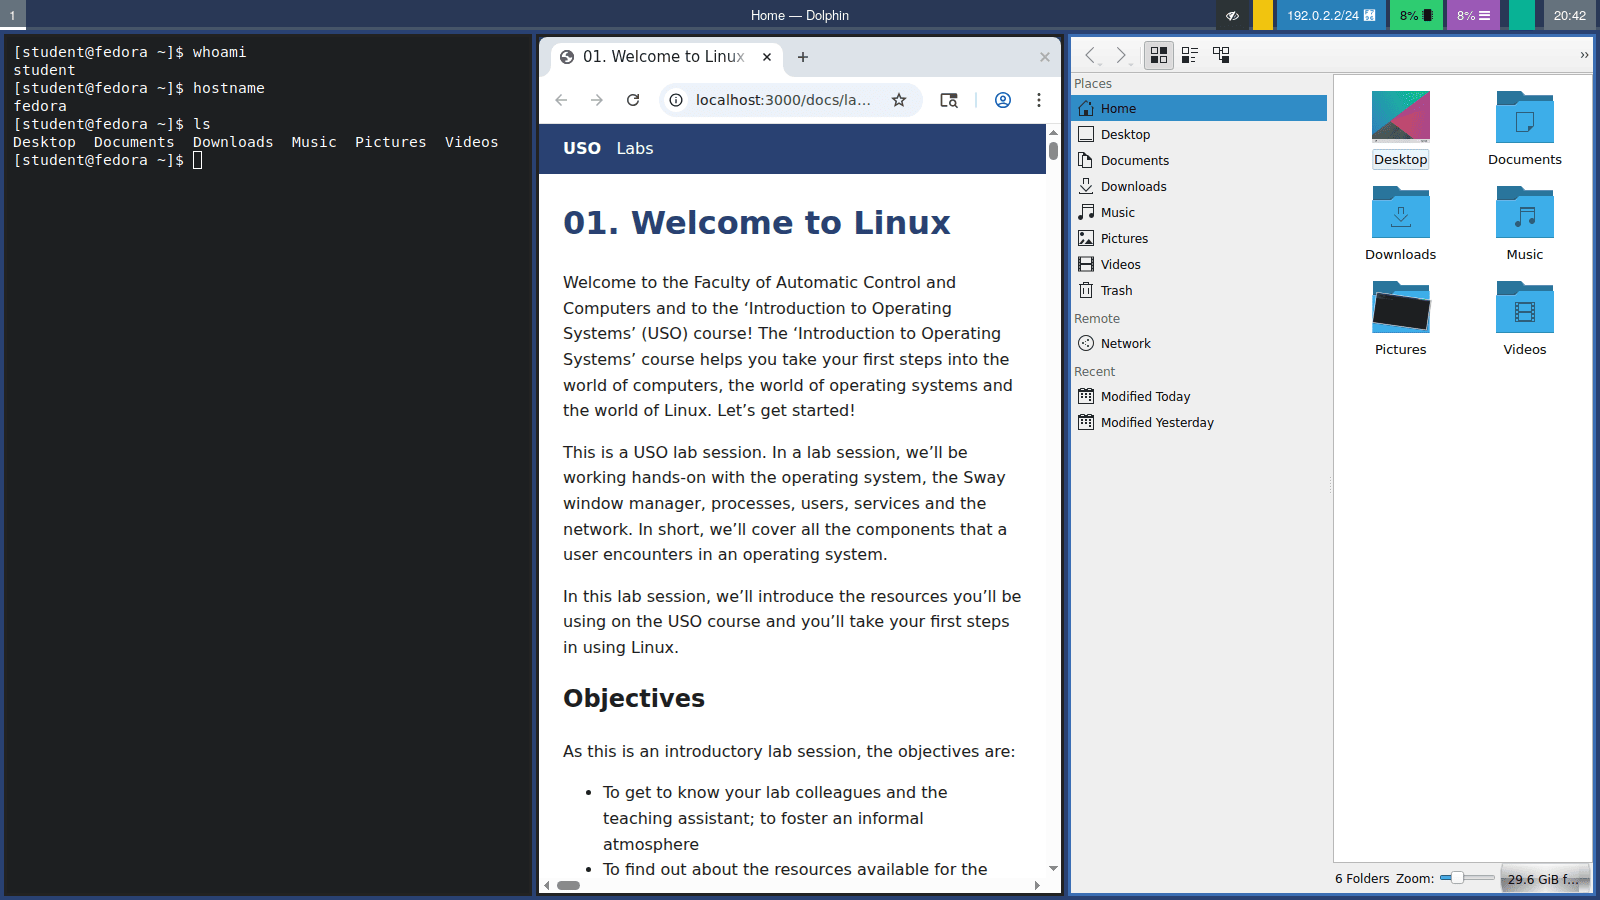
It feels strange at first, but after a few hours it becomes very fast: you never need to move or resize windows with the mouse again.
Sway is very small. It only manages windows and shows a bar at the top or bottom of the screen. Other tasks are done by separate small programs, for example:
| Task | Program |
|---|---|
| Terminal | foot |
| Application launcher (a menu to start programs) | rofi, wofi or wmenu |
| Status bar | swaybar or waybar |
| File manager (to browse files and folders) | thunar |
Fedora offers an edition called Fedora Sway, which comes with Sway and all
these programs already configured. On other distributions, Sway can be installed with the package manager (for
example sudo dnf install sway or sudo apt install sway).
First Steps in Sway
The Mod Key
Almost every Sway shortcut starts with a special key called the mod key, written $mod. By default it is the
Super key (the key with the Windows logo). So $mod + Enter means: hold the
Super key and press Enter.
If you run Sway inside a VM, the host might "steal" the Super key. Click inside the VM window first so that the hypervisor captures the keyboard (see Keyboard and Mouse Capture).
The Essentials
If you remember only these, you can already use Sway:
| Keybinding | Action |
|---|---|
| $mod + Enter | Open a terminal |
| $mod + d | Open the application launcher |
| $mod + arrow keys | Move the focus to another window |
| $mod + 1 ... 9 | Go to workspace 1 ... 9 |
| $mod + Shift + q | Close the window |
| $mod + Shift + e | Exit Sway (log out) |
When Sway locks the screen, nothing is shown: no login box, no password field, no message, only a plain screen(by default with the background image). The computer is not frozen. Just type your password and press Enter. While you type, a small circle appears in the middle of the screen. If the monitor is off, press any key or move the mouse first to wake it up.
Default Keybindings
You do not need to memorize this table. Come back to it during the exercises.
| Keybinding | Action |
|---|---|
| $mod + Enter | Open a terminal |
| $mod + d | Open the application launcher |
| $mod + Shift + q | Close the focused window |
| $mod + arrow keys (or h j k l) | Move the focus left / down / up / right |
| $mod + Shift + arrow keys (or h j k l) | Move the focused window left / down / up / right |
| $mod + 1 ... 0 | Go to workspace 1 ... 10 |
| $mod + Shift + 1 ... 0 | Move the focused window to workspace 1 ... 10 |
| $mod + b | The next window will open to the right |
| $mod + v | The next window will open below |
| $mod + e | Switch between side by side and one above another |
| $mod + w | Tabbed layout |
| $mod + s | Stacking layout |
| $mod + f | Fullscreen on / off |
| $mod + r | Resize mode (arrow keys resize, Esc exits) |
| $mod + Shift + Space | Floating on / off for the focused window |
| $mod + Space | Move the focus between tiled and floating windows |
| $mod + Shift + - | Hide the focused window in the scratchpad |
| $mod + - | Show / hide the scratchpad window |
| $mod + Shift + c | Reload the configuration file |
| $mod + Shift + e | Exit Sway (log out) |
| $mod + left mouse drag | Move a floating window |
| $mod + right mouse drag | Resize a window |
Why h j k l? They come from the vi text editor, where they mean left,
down, up and right. Your hand stays in the middle of the keyboard. You can use the arrow keys instead, they do the
same thing.
vi was written by Bill Joy in 1976, at a time when keyboards usually had no separate arrow keys. He used an
ADM-3A terminal, where the arrows were printed directly on the h j k
l keys, so those letters became the way to move the cursor. The same keyboard also had Esc
where Tab is today, which is why vi uses Esc so much. Many programs still use these keys today:
vim, less, man, and of course Sway.
Core Concepts
Focus
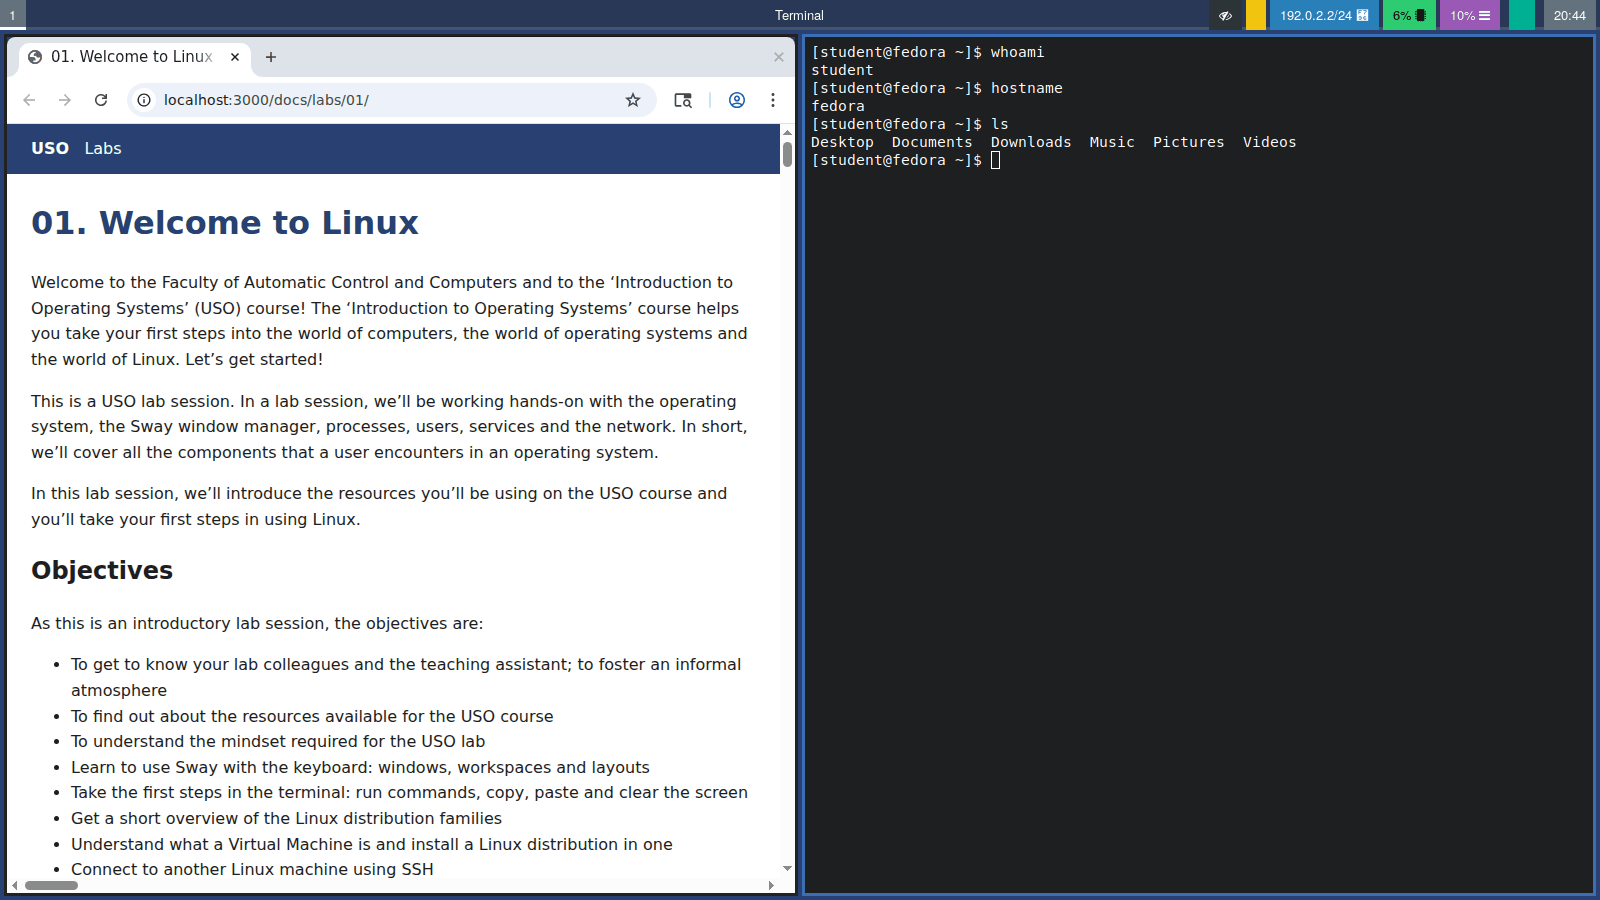
At any moment, exactly one window has the focus: it is the window that receives what you type. In Sway, the focused window has a colored border. When you type and "nothing happens", check which window has the focus.
Workspaces
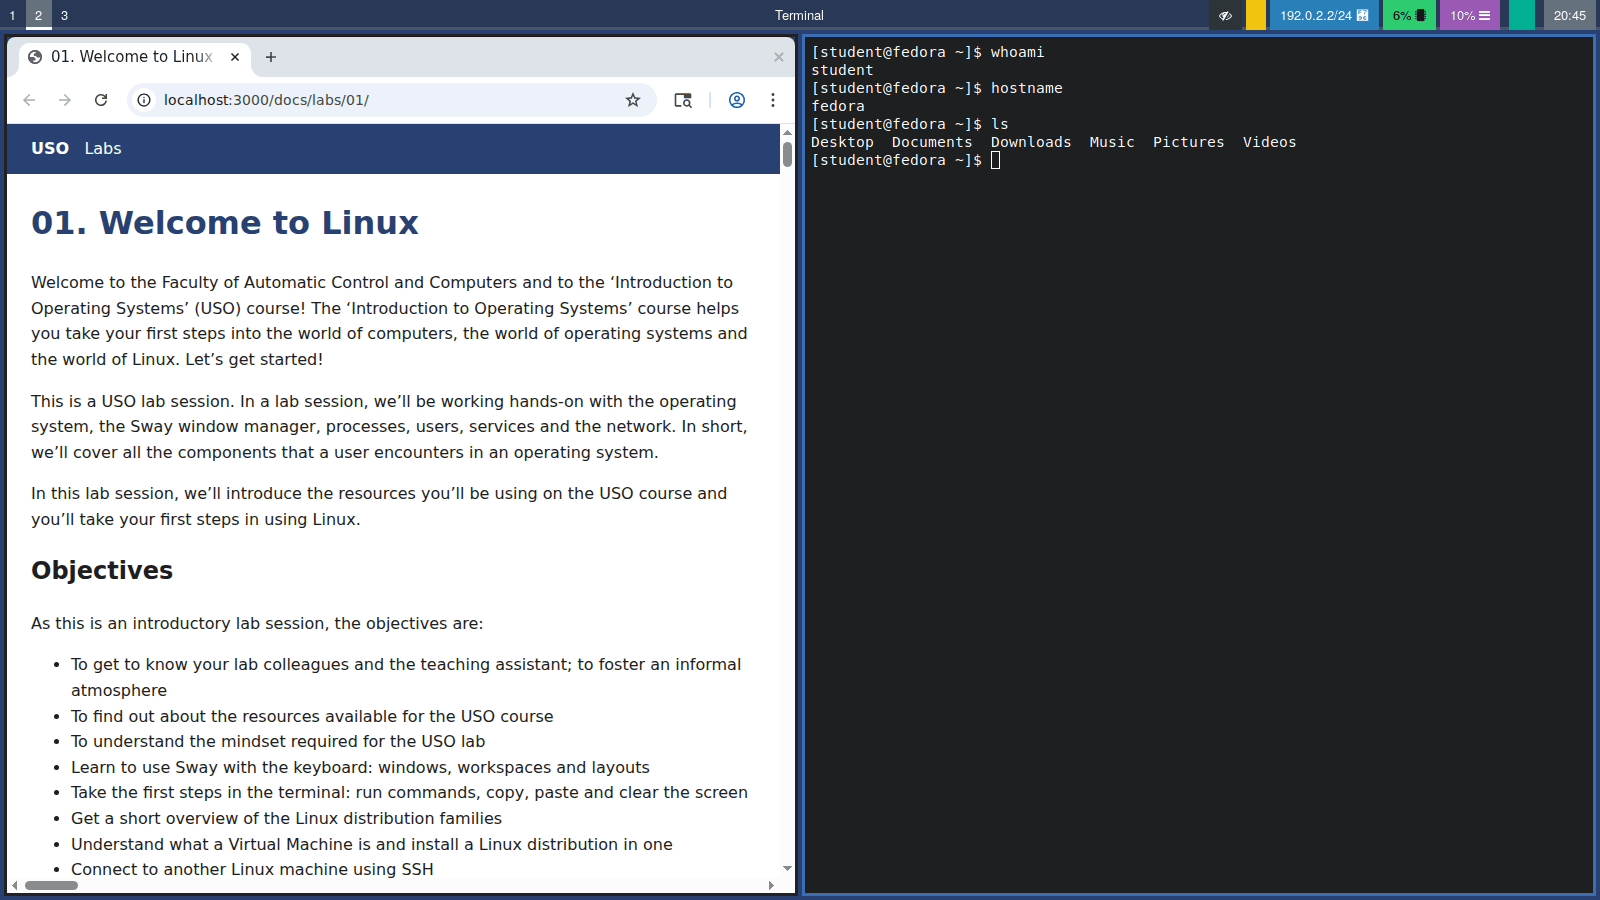
A workspace is like a separate screen. You can keep your browser on workspace 1, your terminals on workspace 2 and your music on workspace 3, and jump between them with $mod + a number. The bar shows the workspaces that are in use. A workspace disappears automatically when it is empty and you leave it.
Layouts
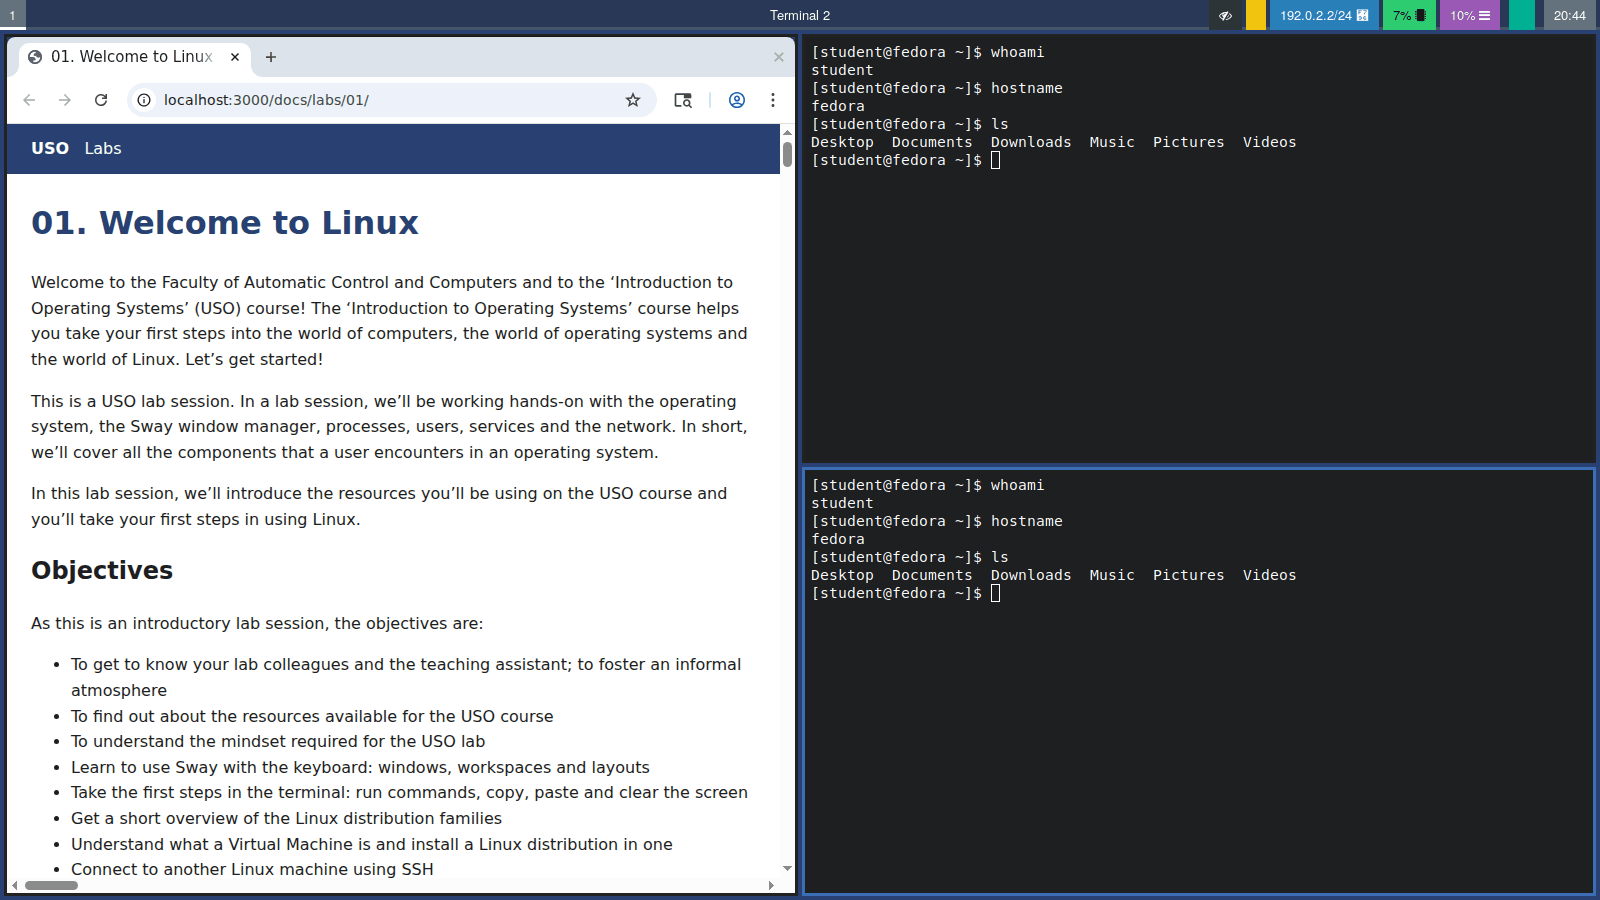
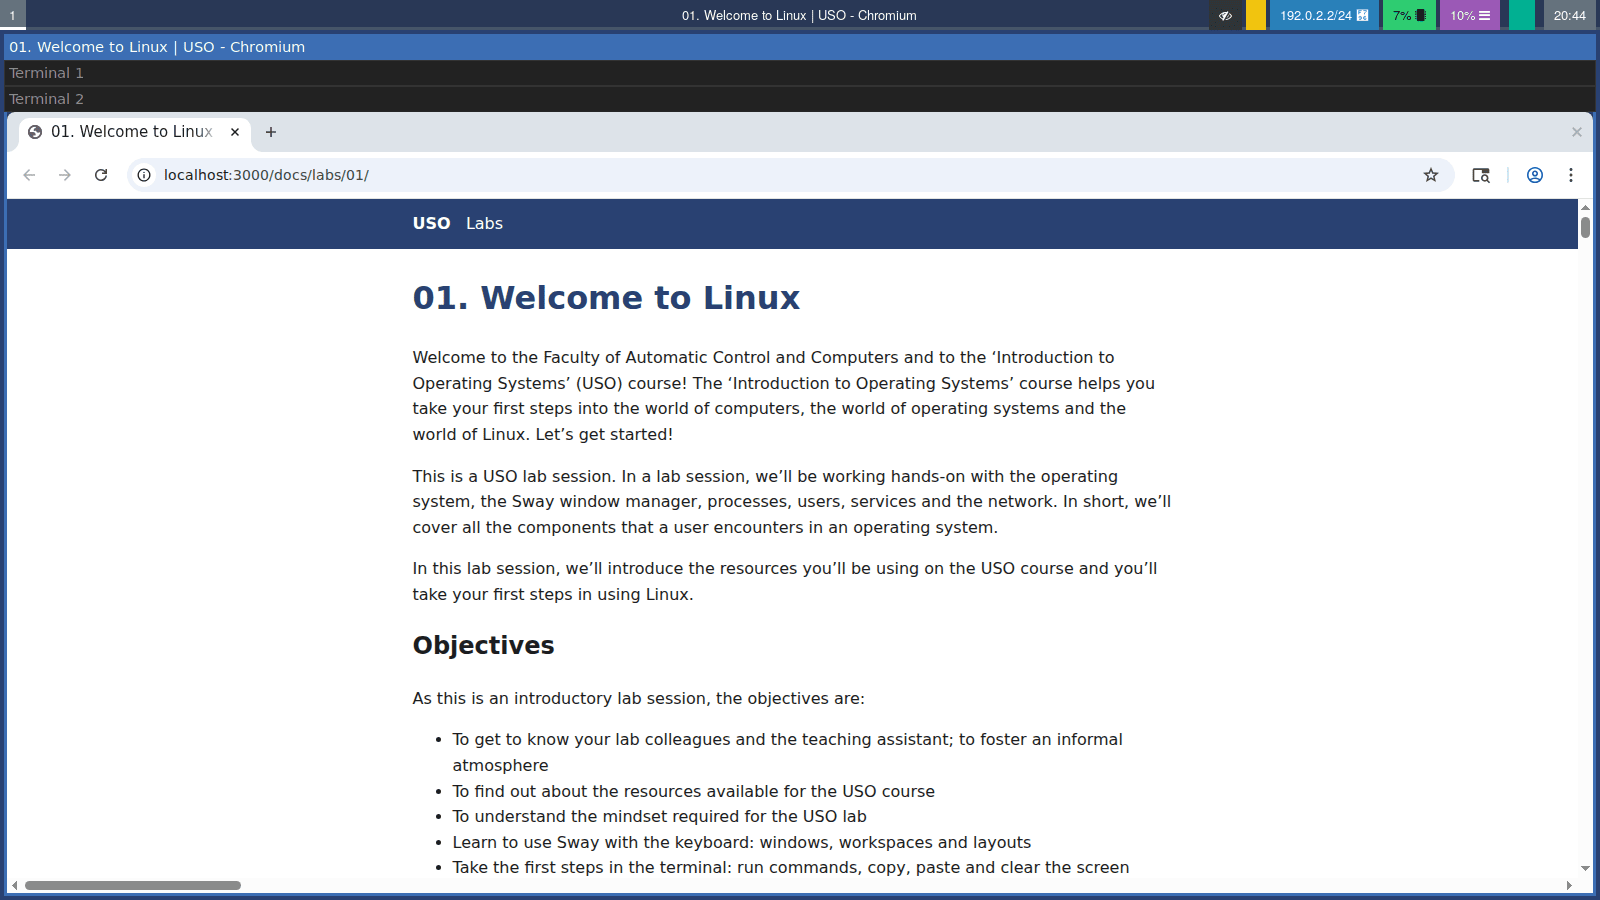
Windows on a workspace are arranged in one of four ways:
| Layout | Keybinding | What you see |
|---|---|---|
| Side by side | $mod + e | Windows next to each other, left to right |
| One above another | $mod + e (press again) | Windows on top of each other, top to bottom |
| Tabbed | $mod + w | One window at a time, with tabs at the top, like a web browser |
| Stacking | $mod + s | One window at a time, with a list of titles at the top |
| Split: the browser on the left, two terminals one above another on the right | Tabbed: the browser and two terminals |
|---|---|
 | 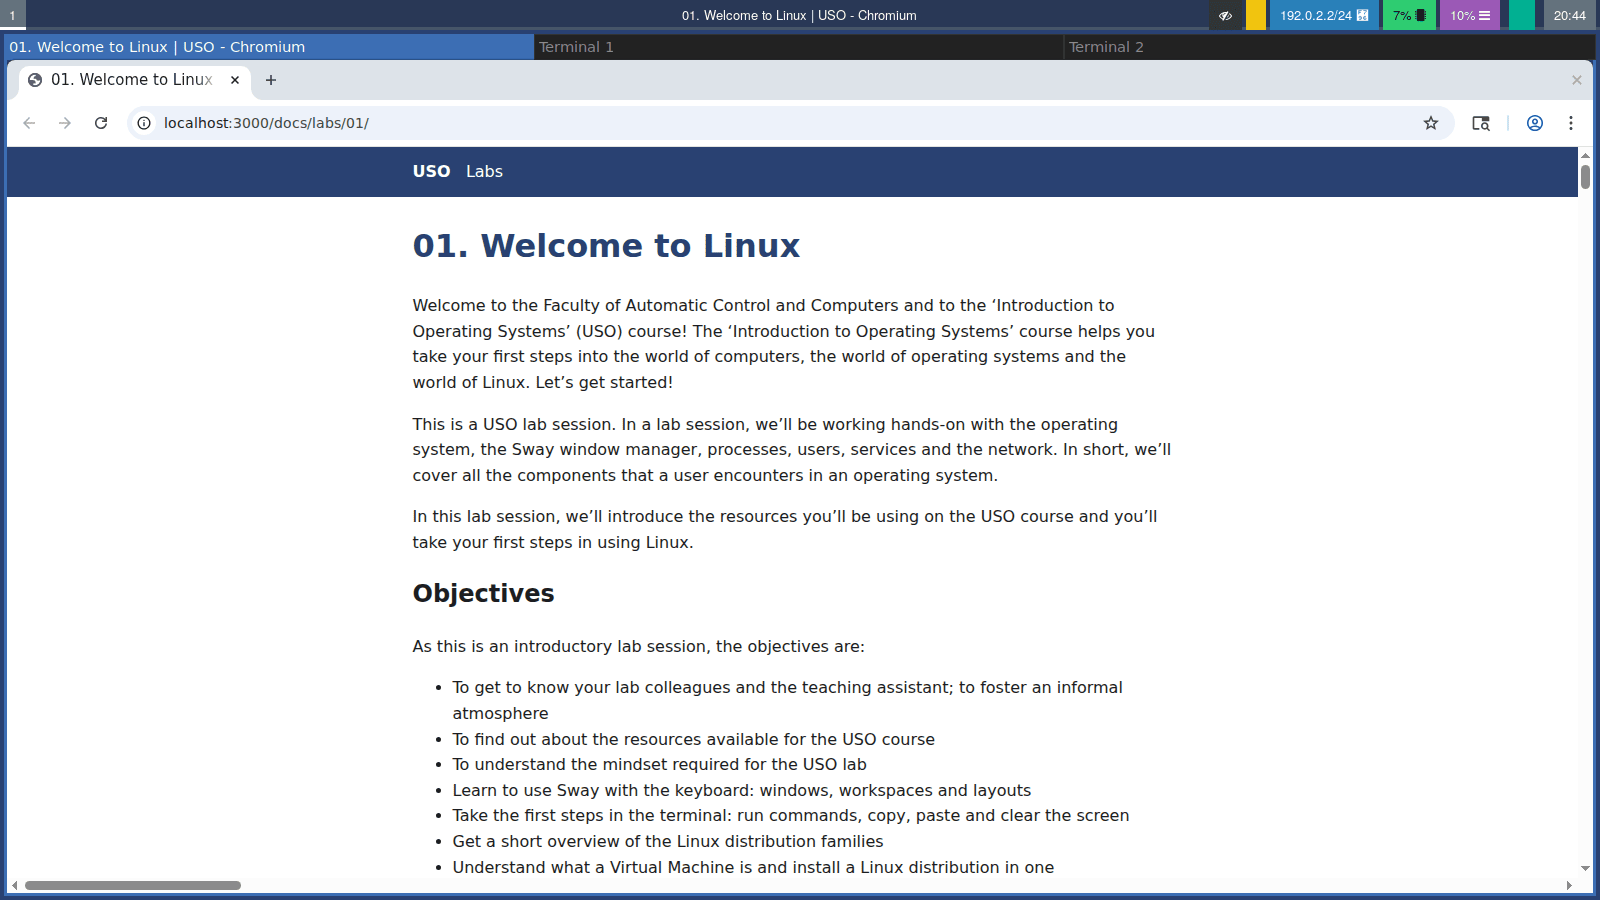 |
$mod + b and $mod + v do not move anything right away. They tell Sway where the next window will open. Press one of them, then open a new terminal to see the effect.
Floating Windows
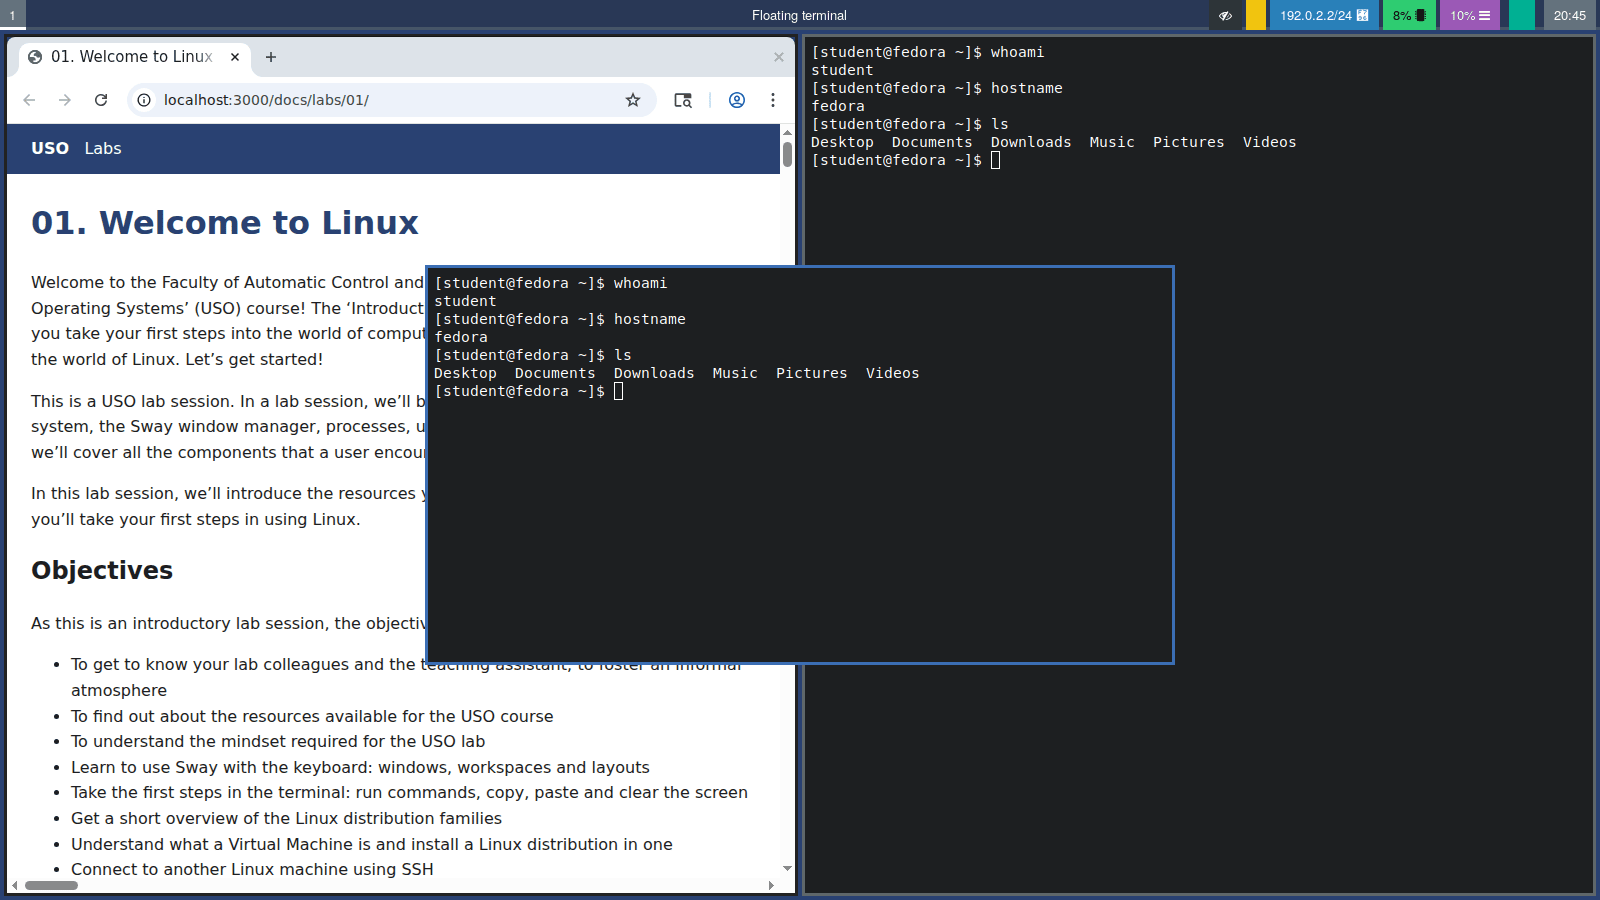
Some windows (small dialogs, a calculator) look better on top of the others. These are floating windows. Make any window float with $mod + Shift + Space, and press the same keys again to put it back into the tiles.
The Scratchpad
The scratchpad is a hidden place for windows you need only from time to time. Hide a window there with $mod + Shift + - and bring it back, on any workspace, with $mod + -.
Resize Mode
After pressing $mod + r, the arrow keys resize the focused window instead of moving the focus. Press Esc to return to normal.
Tools
Sway itself only places windows on the screen. Almost everything else you see and use (the bar, the terminal, the application launcher, the lock screen, the screenshots) is done by small separate programs, and Sway simply runs them as commands in the background. For example:
- $mod + Enter is just a keybinding that runs the command
foot(the terminal); - $mod + d is a keybinding that runs the application launcher.
In the configuration file this looks like bindsym $mod+Return exec foot: "when this key is pressed, run this
command". This means that you can also run all these programs yourself, by typing their name in a
terminal, and that you can change how your desktop behaves by changing the commands (see
Modding Sway).
Locking the Screen
swaylock locks the screen. Run it in a terminal and the screen is locked right away:
swaylock
Remember that the lock screen shows nothing: just type your password and press Enter to unlock it.
The -f option means fork: swaylock locks the screen and then moves to the background, so the terminal does
not wait for you to unlock the screen. Try it: run swaylock in a terminal and, after unlocking, look at when the
$ comes back; then do the same with swaylock -f.
Screenshots
On Sway, applications cannot capture the screen by themselves. grim takes the screenshot:
grim ~/Pictures/full.png # the whole screen
To look at your screenshots, use Thunar, the file manager installed on the lab computers. Open it from the
application launcher ($mod + d, type thunar) or by running thunar in a terminal, go to
the Pictures folder and double click an image to open it.
The Terminal
The terminal is the tool you will use the most, not only in this lab but in the whole USO course. It is a
window where you type commands instead of clicking with the mouse: you write a command, press Enter, and
the computer runs it and shows the result. Almost everything you will do in the following labs (working with files,
users, processes, services and the network) happens in the terminal. In Sway, open one with $mod +
Enter (the default terminal is foot). For now, you only need the basics below; the terminal and the
shell (the program that reads and runs your commands) will be presented in detail in the following labs.
Running Commands
When the terminal is ready, it shows a line that ends with a $ sign, called the prompt. It usually looks
like this:
[student@fedora ~]$
The $ means "I am waiting for your command". Type a command after it and press Enter to run it. While
the command runs, the $ disappears; when the command finishes, the terminal prints a new $ on a new line, and
only then you can type the next command.
For example, sleep 5 does nothing for 5 seconds. Run it and watch: the $ is "hidden" for 5 seconds and comes
back only when sleep finishes. If you type something in the meantime, it is not run as a new command right away.
If you do not want to wait, press Ctrl+C to stop the command and get the $ back.
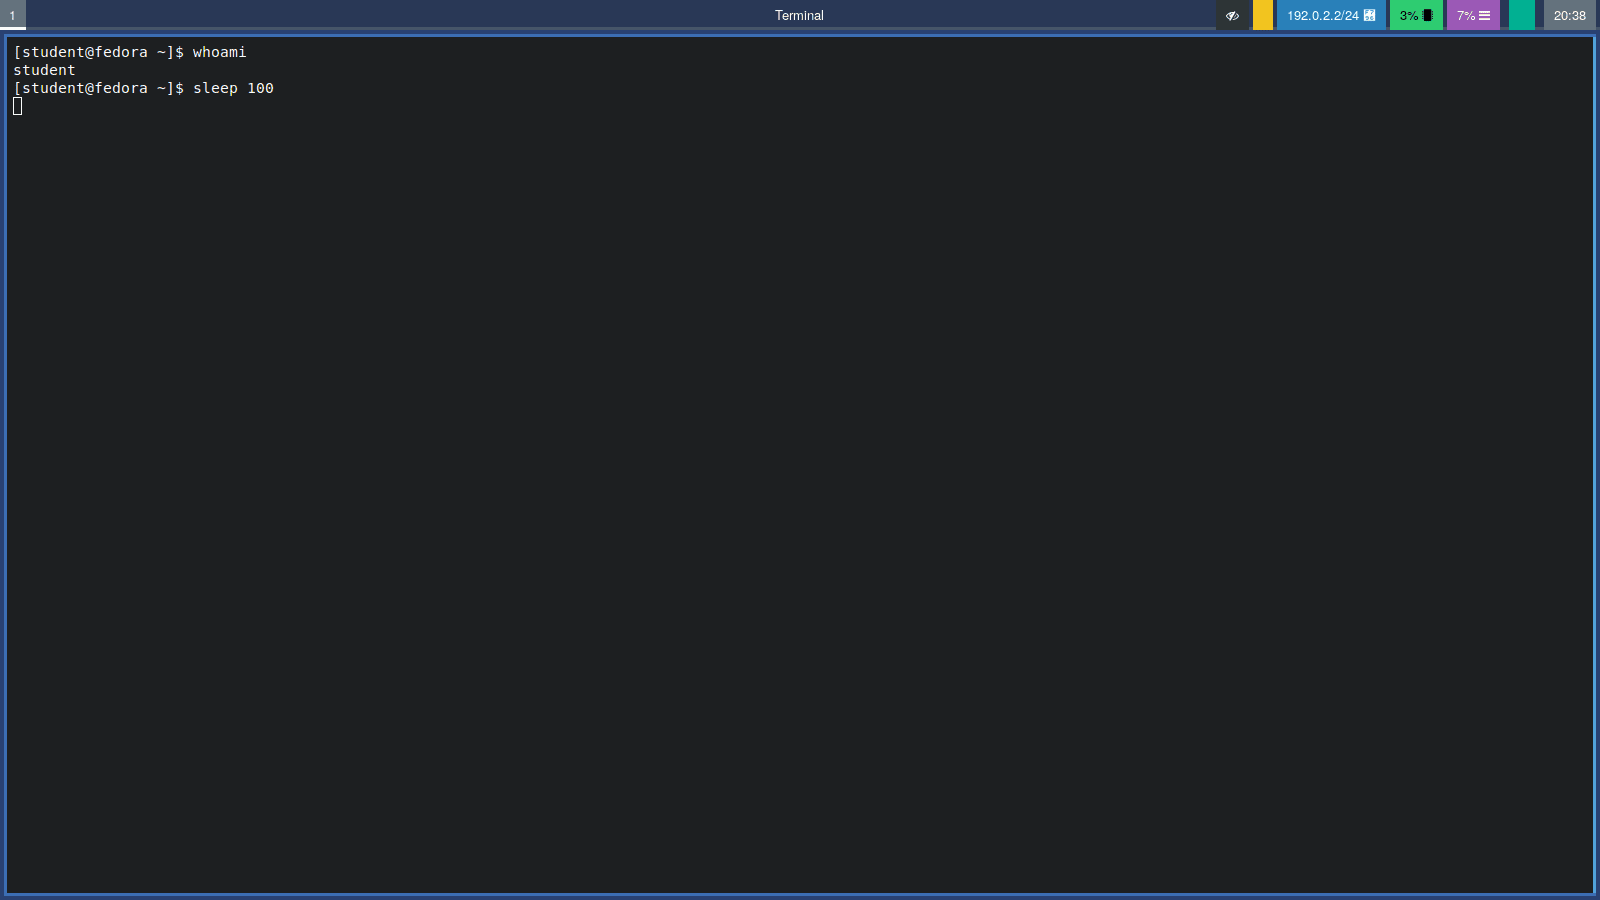
If you do not see a $ at the end of the last line, a command is still running (or a program such as nano or
man is open). Wait for it to finish, close the program, or press Ctrl+C.
A few commands you will need in this lab:
| Command | What it does |
|---|---|
whoami | Shows your user name |
hostname | Shows the name of the computer |
ls | Lists the files in the current directory |
sleep <seconds> | Waits the given number of seconds, then finishes |
clear | Clears the terminal screen (the shortcut Ctrl+L does almost the same) |
ip a | Shows the network addresses of the computer |
nano <file> | Opens a simple text editor (Ctrl+O saves, Ctrl+X exits) |
exit | Closes the terminal (or an SSH connection) |
When the screen is full of old output and you lose track of what you typed, run clear (or press
Ctrl+L) to start again from a clean screen. Your files and programs are not affected: it
only cleans the terminal window.
Copy and Paste
In most applications (the browser, the text editor, the file manager) you copy with Ctrl + C and paste with Ctrl + V. The terminal is different, because there these keys already have another meaning: Ctrl + C stops (interrupts) the command that is running. So, in the terminal, copy and paste use an extra Shift key:
| Keybinding | Action in the terminal |
|---|---|
| Select the text with the mouse, then Ctrl + Shift + C | Copy the selected text |
| Ctrl + Shift + V | Paste the copied text at the cursor |
| Select the text with the mouse, then click the middle mouse button (the wheel) | Quick copy and paste, without any key |
| Ctrl + C | Not copy! Stops the running command |
The Ctrl + Shift prefix is only for the terminal. In every other application (the browser, the text editor, the file manager) keep using the usual Ctrl + C and Ctrl + V. The clipboard is shared: text copied in the terminal with Ctrl + Shift + C can be pasted in the browser with Ctrl + V, and text copied in the browser with Ctrl + C can be pasted in the terminal with Ctrl + Shift + V.
Selecting text and clicking the middle mouse button uses a second, separate clipboard, called the primary selection. It works in (almost) all Linux applications, not only in the terminal, and it does not change what you copied with Ctrl + C.
Be careful when you paste commands copied from a web page. If the text ends with a new line, the command runs immediately, before you have a chance to read it. Paste only commands that you understand.
Linux Distributions
Linux itself is only the kernel, the core of the operating system. To get something you can actually use, you also need a shell, tools, a graphical interface, applications and a way to install new programs. A Linux distribution (or distro) puts all of these together into a complete operating system.
There are hundreds of distributions, but most of them belong to a few families. The biggest difference between the families is the package manager, the program you use to install software.
| Family | Examples | Install a program with |
|---|---|---|
| Debian | Debian, Ubuntu, Linux Mint | sudo apt install <name> |
| Red Hat | Fedora, RHEL, CentOS Stream | sudo dnf install <name> |
| Arch | Arch Linux, Manjaro | sudo pacman -S <name> |
| SUSE | openSUSE | sudo zypper install <name> |
Many distributions come in several flavors (also called spins or editions): the same system, but with a different graphical interface. For example, Fedora Sway is Fedora with Sway instead of the default GNOME desktop.
Our lab computers run Fedora, so you will use the dnf package manager. If you are curious about other
distributions, click here for a random one.
Virtual Machines
A Virtual Machine (VM) lets you run an operating system as an application. It runs a complete operating system (the guest) inside a window of your real operating system (the host). The guest thinks it has its own CPU, memory, disk and network card, but it is actually sharing those of the host. The program that makes this possible is called a hypervisor.
Why is this useful?
- You can try a new distribution without touching your real system.
- If you break something inside the VM, your computer is not affected.
- You can save the state of a VM (a snapshot) and go back to it later.
- Servers on the internet very often run inside VMs.
The most common programs for running VMs are:
| VirtualBox | VMware Workstation / Fusion | QEMU | |
|---|---|---|---|
| Price | Free | Free for personal use | Free |
| Runs on | Windows, macOS, Linux | Windows, macOS | any major CPU architecture |
| Good for | Beginners, it is easy to use | Better performance | Advanced users, many CPU types |
To install an operating system in a VM, you need its ISO image: a single file (ending in .iso) that contains
the installer, like a virtual DVD. You download it from the website of the distribution.
Download the ISO image that matches your computer's processor. Most PCs are x86_64 (and their architecture is
called amd64), while new Apple Macs (M1, M2, ...) are arm64 (and their architecture is called aarch64).
Creating a VM in VirtualBox
We will use VirtualBox, which is installed on the lab computers.
- Open VirtualBox and click New.
- Give the VM a name and choose the ISO image (you can find several under the
Downloads/directory). - Set the memory (RAM) to 4 GB and the number of CPUs to 2.
- Create a virtual hard disk of 20 GB.
- Before starting the VM, open Settings and check the settings from the table below.
- Click Start. The VM boots from the ISO image and you can run the installer.
- Follow the installer. Most of the time the default options are fine. When you create your user:
- choose a simple user name (for example
student) and a password you will remember; - if the installer shows an option such as Make this user administrator, check it. Without it,
sudowill not work and you will not be able to do the SSH exercises.
- choose a simple user name (for example
- At the end, the installer asks you to reboot. After the reboot, you should see the login screen of the installed system.
If after the reboot the VM starts the installer again instead of the installed system, the ISO image is still attached. Shut down the VM, open Settings → Storage, select the ISO under the optical drive and remove it, then start the VM again.
| Setting | Value | Why |
|---|---|---|
| Display → Graphics Controller | VMSVGA | Needed for some graphical interfaces |
| Display → Video Memory | 128 MB | |
| Display → Enable 3D Acceleration | checked | Needed for some graphical interfaces |
| Network → Adapter 1 | NAT | The VM gets internet access on any network |
| Network → Adapter 1 → Advanced → Port Forwarding | Host port 2222 → Guest port 22 | So you can connect to the VM with SSH later (see Port Forwarding) |
Keyboard and Mouse Capture
Your keyboard and mouse are shared between the host and the VM, so the hypervisor has to decide who receives each key you press. When you click inside the VM window, the hypervisor captures the keyboard and mouse: from now on, the keys go to the VM, not to the host. To give them back to the host, press the Host key (in VirtualBox, by default the right Ctrl). The small keyboard icon at the bottom right of the VirtualBox window shows who has the keyboard right now.
Each hypervisor uses a different key combination to release the keyboard and mouse:
| Hypervisor | Release keyboard and mouse | Toggle fullscreen | Send Ctrl+Alt+Del to the VM |
|---|---|---|---|
| VirtualBox (Windows, Linux) | Right Ctrl (the Host key) | Host + F | Host + Del |
| VirtualBox (macOS) | Left ⌘ Command | Host + F | Host + Del |
| VMware Workstation (Windows, Linux) | Ctrl + Alt | Ctrl + Alt + Enter | Ctrl + Alt + Insert |
| VMware Fusion (macOS) | Ctrl + ⌘ Command | Ctrl + ⌘ Command + F | Menu Virtual Machine → Send Key |
| QEMU | Ctrl + Alt + G or Left Ctrl + Left Alt | Ctrl + Alt + F or Menu View → Fullscreen | Menu Machine or the QEMU monitor or Menu Send Key |
In VirtualBox you can change the Host key in File → Preferences → Input → Virtual Machine → Host Key Combination. The other hypervisors also let you change these combinations in their preferences, so a computer configured by someone else might use different keys.
This matters a lot for the Super key (the key with the Windows logo). Both the host and the guest want to use it: GNOME opens its overview with it, and Sway uses it for almost every shortcut. If the keyboard is not captured, the host gets Super and the VM never sees it.
- Always click inside the VM window before using Super shortcuts in the VM.
- Check that Auto Capture Keyboard is enabled (in VirtualBox: File → Preferences → Input).
- If the host still reacts to Super, put the VM in fullscreen (in VirtualBox: View → Full-screen Mode, or Host + F). Press the same keys again to leave fullscreen.
If you feel "stuck" inside the VM (the mouse will not leave the window, or your host shortcuts do not work), press the release combination of your hypervisor from the table above (in VirtualBox, the Host key once).
Snapshots
A snapshot saves the complete state of a VM at one moment. In VirtualBox, select the VM, open the Snapshots view and click Take. If something goes wrong later, select the snapshot and click Restore: the VM goes back exactly as it was. Take a snapshot right after every successful installation.
Remote Access
SSH (Secure Shell) lets you open a terminal on another computer over the network. Everything you type is sent, encrypted, to the other computer and runs there. This is how people manage servers that have no screen at all.
Two programs are involved:
- the SSH server (
sshd) runs on the computer you want to reach; - the SSH client (
ssh) runs on the computer you are sitting at.
To reach a computer, you need its IP address, a number like 192.168.1.25 that identifies it on the network, and
a port, a number that tells the computer which program should receive the connection. The SSH server listens on
port 22 by default. On Linux, ip a shows the IP address (look for inet in the section of the network card,
not the 127.0.0.1 one).
Port Forwarding
With NAT, the VM is hidden behind the host, like a computer behind a home router. Inside the VM, ip a shows an
address such as 10.0.2.15, but this address exists only inside VirtualBox: the host cannot use it to reach the
VM. The solution is port forwarding: we ask VirtualBox to listen on a port of the host and to send everything that
arrives there to a port of the VM.
  host                                          VM
  ssh student@localhost -p 2222  ──►  VirtualBox  ──►  sshd on port 22
The localhost (or 127.0.0.1) is a special name that always means this computer. So when you run
ssh -p 2222 student@localhost on the host, you connect to the host itself on port 2222, and VirtualBox passes the
connection on to port 22 of the VM. We use 2222 because port 22 of the host may already be used by the host's own
SSH server.
To add the rule in VirtualBox:
- Select the VM, open Settings → Network → Adapter 1, and check that it is attached to NAT.
- Expand Advanced and click Port Forwarding.
- Click the + button and fill in the new rule:
| Name | Protocol | Host IP | Host Port | Guest IP | Guest Port |
|---|---|---|---|---|---|
| ssh | TCP | 127.0.0.1 | 2222 | (leave empty) | 22 |
- Click OK. The rule works immediately, even if the VM is already running.
Connecting to a VM
On the VM (the computer you want to reach):
sudo systemctl enable --now sshd # start the SSH server
When using Fedora you might need to allow the connection through the firewall using:
sudo firewall-cmd --add-service=ssh --permanent
sudo firewall-cmd --reload
sudo asks for your own password (not a special administrator password). After you type it correctly, it
remembers it for a few minutes, so it does not ask again for every command.
When you type a password in the terminal, nothing appears on the screen: no letters, no dots, no stars. This is normal and is done for security. Type the password anyway and press Enter. If you make a mistake, press Ctrl+U to clear what you typed and start again.
On the host (the lab computer):
ssh -p 2222 student@localhost # log in, replace "student" with your username inside the VM
The first time, SSH asks if you trust the computer: type yes. Then type the password of the user on the VM. Now
every command you type runs on the VM. Type exit to come back to the host.
Without the port forwarding rule, ssh -p 2222 student@localhost answers Connection refused. Without -p 2222,
ssh tries port 22 of the host and you end up logging in to the host, not the VM. Run hostname after logging in
to check where you are.
In all the commands in this lab, student is only an example. Replace it with the user name you created in
the VM installer.
SSH from Windows and macOS
Windows 10/11 and macOS already have the ssh command (in PowerShell or in the Terminal app). There are also
graphical programs, such as PuTTY and
MobaXterm for Windows, or Termius for all systems. In all of
them, use localhost as the host name and 2222 as the port.
Troubleshooting
| Problem | Solution |
|---|---|
| I pressed keys but nothing happened | Check which window has the focus (the colored border). In a VM, click inside the VM window first |
| Super does not work in the VM | Click inside the VM to capture the keyboard, or put the VM in fullscreen (see Keyboard and Mouse Capture) |
| The mouse cannot leave the VM window | Press the release keys of your hypervisor (in VirtualBox the Host key, right Ctrl; see the table in Keyboard and Mouse Capture) |
| Sway does not start in the VM, or the screen is black | Enable 3D Acceleration and use the VMSVGA graphics controller in the VM Display settings |
| The mouse cursor is invisible in the VM | Add export WLR_NO_HARDWARE_CURSORS=1 to ~/.bash_profile, then log out and in again |
ssh says Connection refused | Check the port forwarding rule (host port 2222 → guest port 22), that the SSH server is running in the VM (systemctl status sshd) and that you opened the firewall |
ssh logged me in, but hostname shows the host | You forgot -p 2222, so you connected to the host itself |
ssh shows WARNING: REMOTE HOST IDENTIFICATION HAS CHANGED! | You reinstalled the VM, or another VM now uses port 2222. Run ssh-keygen -R "[localhost]:2222" on the host and connect again |
Exercises
The exercises cover the main parts of the lab: Sway, the terminal, virtual machines and remote access. Each one is marked with where to do it:
- 🧪 in the lab: the exercises that need the lab computers (Sway, VirtualBox and the
.isoimages) or the help of a teaching assistant; - 🏠 at home: more practice with the same tools. You need Sway: install Fedora Sway in a virtual machine, or install Sway on your Linux.
If you finish the 🧪 exercises early, continue with the 🏠 ones, and then with the Extra section.
Getting Used to Sway
Do these exercises in order. Try to use only the keyboard.
-
🧪 Look around: Log in to Sway. Look at the bar: can you find the workspace number and the clock? Is there anything else on the screen? → Welcome to the Tiles of Sway
-
🧪 Your first terminal: Open a terminal with $mod + Enter. Type
whoami, thenhostname, thenls. Close the terminal with $mod + Shift + q. → The Essentials · Running Commands -
🧪 Tiling: Open one terminal, then a second one, then a third one. What happens to the size of the windows each time you open a new one? Now close them one by one and watch again. → Welcome to the Tiles of Sway
-
🧪 Focus: Open three terminals. Move the focus between them with $mod + arrow keys. In each terminal, type a different word (for example
one,two,three) to be sure you know which window has the focus. → Focus -
🏠 The vi keys: Do the previous exercise again, but use $mod + h and $mod + l instead of the arrow keys. → Default Keybindings
-
🧪 Moving windows: With three terminals open, move the focused one to the far left, then to the far right, using $mod + Shift + arrow keys. → Default Keybindings
-
🧪 The launcher: Press $mod + d, type the first letters of
firefoxand press Enter. Use the launcher again to open the file manager, Thunar (typethunar). → The Essentials -
🏠 Fullscreen: Focus the browser and press $mod + f. Press it again to go back. → Default Keybindings
-
🧪 Workspaces: Go to workspace 2 with $mod + 2 and open a terminal there. Go to workspace 3 and open another one. Jump between workspaces 1, 2 and 3. Look at the bar each time. → Workspaces
-
🧪 Moving to another workspace: Focus the browser and send it to workspace 4 with $mod + Shift + 4. Where are you now: on workspace 4 or still on the old one? Go to workspace 4 and check that the browser is there. → Workspaces
-
🏠 Empty workspaces: Move the only window from workspace 3 to workspace 1. Look at the bar: what happened to workspace 3? → Workspaces
-
🧪 Splitting: On an empty workspace, open one terminal. Press $mod + v and open a second terminal. Where did it appear? Now press $mod + b and open a third one. Where did that one appear? → Layouts
-
🏠 Build a layout: On an empty workspace, build this: one terminal on the left half of the screen, and two terminals one above the other on the right half. (Hint: open two terminals, focus the right one, press $mod + v, then open the third.) → Layouts
-
🏠 Tabs and stacks: Open three terminals on an empty workspace. Press $mod + w for tabs and move between them with $mod + arrow keys. Then try $mod + s. Go back to the normal layout with $mod + e. → Layouts
-
🏠 Resizing: With two terminals side by side, press $mod + r and make the left one bigger with the arrow keys. Press Esc when you are done. → Resize Mode
-
🏠 Floating: Make a terminal floating with $mod + Shift + Space. Move it by holding $mod and dragging with the left mouse button, and resize it by dragging with the right button. Put it back into the tiles with the same keys. → Floating Windows
-
🏠 The scratchpad: Hide a terminal in the scratchpad with $mod + Shift + -. Go to another workspace and bring it back with $mod + -. Press $mod + - again to hide it. → The Scratchpad
-
🏠 Challenge - your desk: Without using the mouse, set up this:
- workspace 1: the browser, in fullscreen;
- workspace 2: two terminals side by side;
- workspace 3: three terminals in tabs.
Then jump between the three workspaces a few times. → Workspaces · Layouts
-
🏠 Log out and in: Exit Sway with $mod + Shift + e and log in again. Are your windows and workspaces still there? → The Essentials
The Terminal
- 🧪 Clean screen: Open a terminal and run
whoami,hostname,lsandip a. Now runclear. What happened to the screen? Run the commands again and press Ctrl + L this time. Scroll up with Shift + Page Up after each of them: can you still see the old output? → Running Commands - 🧪 From the terminal to the browser: Run
hostname. Select its output with the mouse and copy it with Ctrl + Shift + C. Open the browser, click in the search bar and paste it with Ctrl + V. Now select some text on a web page and press Ctrl + Shift + C in the browser: did it copy the text, or did something else happen? (Close what opened with the same keys.) → Copy and Paste - 🧪 From the browser to the terminal: In the browser, open this page, select the command
ip afrom the Running Commands table and copy it with Ctrl + C. Go to the terminal and paste it with Ctrl + Shift + V, then press Enter. Try Ctrl + V in the terminal as well: what happens? → Copy and Paste - 🏠 From a terminal to another terminal: Open two terminals side by side. In the first one, run
whoamiand copy the output. In the second one, typeecho Hello,, paste the user name and press Enter. → Copy and Paste - 🧪 Ctrl+C is not copy: Run
sleep 10and watch the prompt: when does the$come back? Now runsleep 100(a command that just waits 100 seconds). Can you see a$? While it runs, press Ctrl + C. What happened to the command and to the$? Explain why the terminal uses Ctrl + Shift + C for copy. → Running Commands · Copy and Paste - 🏠 The middle button: Run
ls, select one of the file names with the mouse (a double click selects a whole word) and paste it with the middle mouse button afterls -l. Then paste it in the browser search bar with the middle button too. Did you need any key? → Copy and Paste
Sway Tools
- 🏠 Lock the screen: In a terminal, run
swaylock. What do you see? Unlock the screen by typing your password and pressing Enter. Then runswaylock -c 000000andswaylock -c 0000ff: what does the-coption change? (Hint:man swaylock.) → Locking the Screen - 🏠 Take a screenshot: Run
grim ~/Pictures/full.pngto capture the whole screen. Now runsleep 5; grim ~/Pictures/later.pngand, in those 5 seconds, go to another workspace. Open Thunar, go to thePicturesfolder and look at both screenshots: what does each of them show? → Screenshots
Virtual Machines
- 🧪 Install another distribution: Create a VM following Creating a VM in VirtualBox
and attach the
.isofile of a distribution (you can find several in theDownloads/directory). Boot the VM, run the installer, create a user and set a password. → Creating a VM in VirtualBox - 🧪 Explore the guest: Log in to the VM, open a terminal and run
whoami,hostnameandip a. Run the same commands in a terminal on the host. What is different? Can you guess why the VM's IP address starts with10.0.2? → Virtual Machines · Remote Access - 🧪 Keyboard capture: Click inside the VM window and press Super. Then press the Host key and press Super again. Which system reacted each time: the VM or the host? Watch the keyboard icon at the bottom right of the VM window. → Keyboard and Mouse Capture
- 🏠 Take a snapshot: Shut down the VM and take a snapshot called
fresh-install. → Snapshots - 🏠 Break and restore: Start the VM and create a file with
nano ~/test.txt. Shut down the VM and restore thefresh-installsnapshot. Start the VM again: istest.txtstill there? Why? → Snapshots
Remote Access
- 🧪 Connect via SSH: Make sure the VM network adapter is NAT and add the port forwarding rule (see
Port Forwarding). In the VM, start the SSH server and open the firewall (see
Connecting to a VM). From a terminal on the host, connect with
ssh -p 2222 <user>@localhost. Runhostnameto check that you are on the VM, then typeexit. → Port Forwarding · Connecting to a VM - 🧪 Wrong door: From the host, run
ssh <user>@localhostwithout-p 2222. What happens? Where would you be if it worked? Usehostnameto check. → Port Forwarding - 🧪 Two sides: Put the VM window and a host terminal next to each other. Over SSH, create a file with
nano hello.txtand write something in it. Then, in a terminal inside the VM window, runlsandcat hello.txt. Is it the same file? → Connecting to a VM
Wrap-up Questions
Use the last 5 minutes of the lab to answer these questions together with your colleagues and the teaching assistant. There are no wrong answers for the last three.
- What is a tiling window manager, and how is it different from Windows or macOS?
- What does the focus mean in Sway? How do you know which window has it?
- What is the difference between a window, a layout and a workspace?
- What does the
$at the end of the prompt tell you? What happens to it while a command runs? - Why does the terminal use Ctrl + Shift + C to copy, and not Ctrl + C?
- What is a virtual machine? Which one is the host and which one is the guest?
- Why did you need
-p 2222to connect to the VM with SSH? - What was the hardest thing to get used to in Sway?
- What was faster with the keyboard than with the mouse?
- Would you use Sway on your own computer? Why?
Extra
-
Sway in the VM: Install Sway in the VM you created, using its package manager (see the table in Linux Distributions). Log out and choose Sway on the login screen. Redo a few of the Sway exercises inside the VM. Do the Super shortcuts work? If not, try fullscreen mode. → Linux Distributions · Keyboard and Mouse Capture
-
Two workspaces, two computers: Put the VM on workspace 2 of the host and your SSH terminal on workspace 1. Jump between them with $mod + 1 and $mod + 2. → Workspaces · Remote Access
-
Other tiling window managers: Read about i3, Hyprland or niri. What do they have in common with Sway, and what is different? → Welcome to the Tiles of Sway
-
Your own bar: Copy the Waybar files to
~/.config/waybar/(see The Bar) and change them:- in
config.jsonc, remove one module you do not need frommodules-right(for example the battery on a desktop computer); - in
config.jsonc, make the clock show the seconds too: set itsformatto"{:%H:%M:%S}"and add"interval": 1; - in
style.css, change thebackground-colorofwindow#waybarto a color you like.
Reload Waybar after each change. If the bar disappears, you probably made a mistake in
config.jsonc: runwaybarin a terminal to see the error. → The Bar - in
Modding Sway
All the keybindings above are written in a text file. The default one is /etc/sway/config. To change it, first make
your own copy (never start from an empty file, or you will have no keybindings at all):
mkdir -p ~/.config/sway
cp /etc/sway/config ~/.config/sway/config
nano ~/.config/sway/config
Lines that start with # are comments and are ignored. Some simple things you can change:
# The mod key: Mod4 is Super, Mod1 is Alt
set $mod Mod4

# Space between windows
gaps inner 10

# Keyboard layouts: US and Romanian, switch with Alt+Shift
input type:keyboard {
    xkb_layout "us,ro"
    xkb_variant ",std"
    xkb_options "grp:alt_shift_toggle"
}
Save the file (Ctrl+O, Enter), exit nano (Ctrl+X) and reload
Sway with $mod + Shift + c. If you made a mistake, Sway shows a red bar with the
error at the top of the screen. Open the file again and fix it.
If after editing the file no keybinding works, press Ctrl+Alt+F3 (in a VirtualBox VM:
Host+F3) to get a text console, log in, and run rm ~/.config/sway/config to go back to the
default configuration. If the VM still accepts SSH connections, you can also log in with ssh -p 2222 and fix the
file from the host.
The Bar
Sway has a built-in bar called swaybar, configured in the bar { ... } block (see man 5 sway-bar). Fedora Sway
uses Waybar instead, a much more customizable bar. Waybar is configured with two files:
~/.config/waybar/config.jsonc- which modules to show (workspaces, clock, battery, network, volume, ...) and where~/.config/waybar/style.css- the look of the bar, written in CSS
As with the Sway configuration, start by copying the default files from /etc/xdg/waybar/:
mkdir -p ~/.config/waybar
cp /etc/xdg/waybar/* ~/.config/waybar/
The list of modules and their options is on the Waybar Wiki.
After you change one of these files, reload Sway with $mod + Shift + c, or tell Waybar to reload its files with:
killall -SIGUSR2 waybar